Petrochemical
Plastic & Rubber Recycling
Devolatilization Technology
New Energy
UHMWPE Fiber
Meltblown Lines
This is an operation guide for UM1200 meltblown line.
In this guide, you’ll learn how to start and stop the UM1200 model machine step by step. In the control system, many key parameter values need to be set. So we have prepared a lot of screenshots of the control system containing the key parameter values to help you better use our meltblown machine.
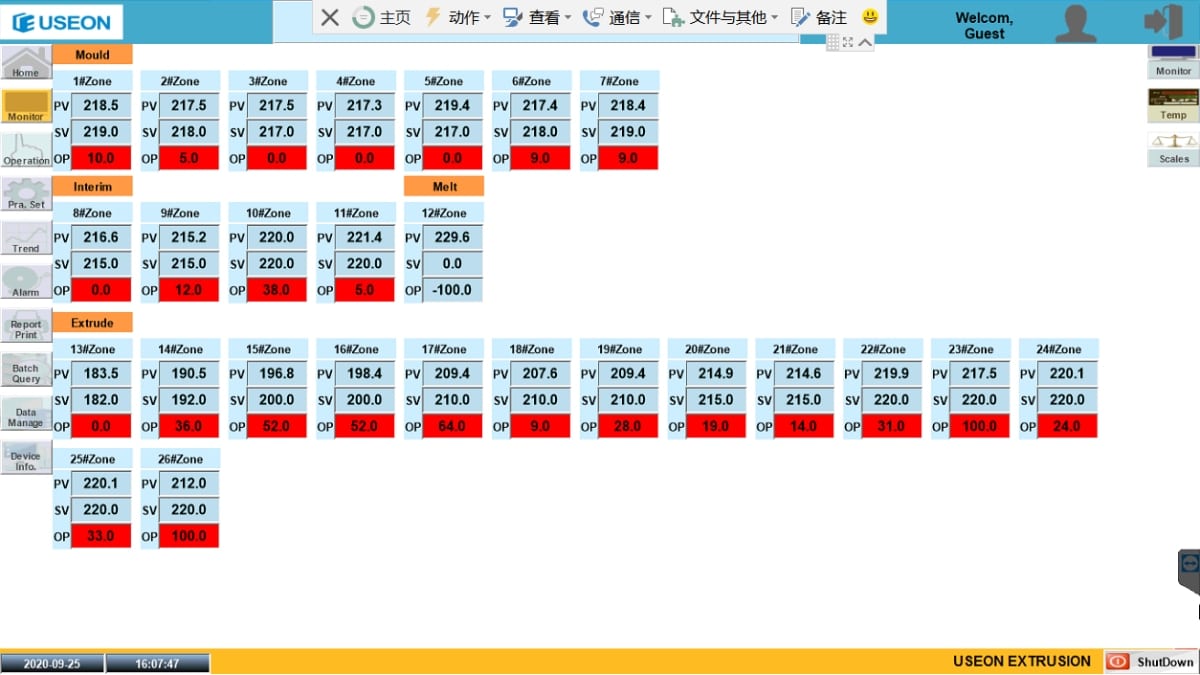
1) Switch on the power, Press “Temp” , set the temperature of each zone (Fig. 1).
Fig. 1: Temperature setting (SV value)
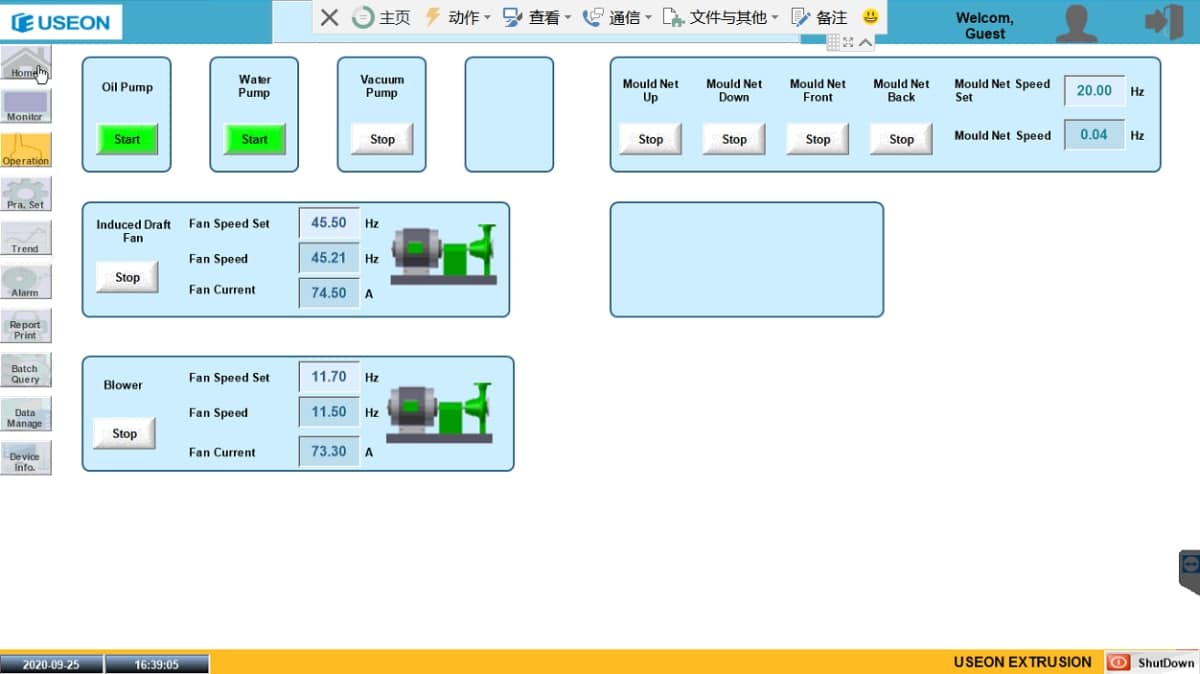
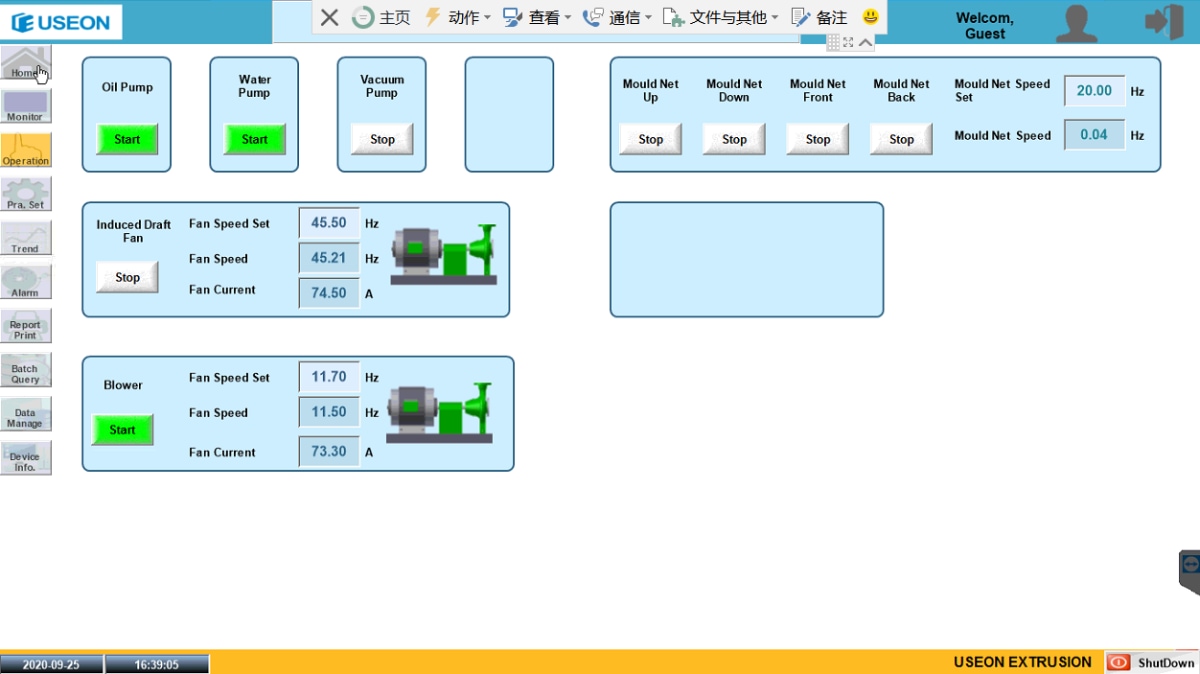
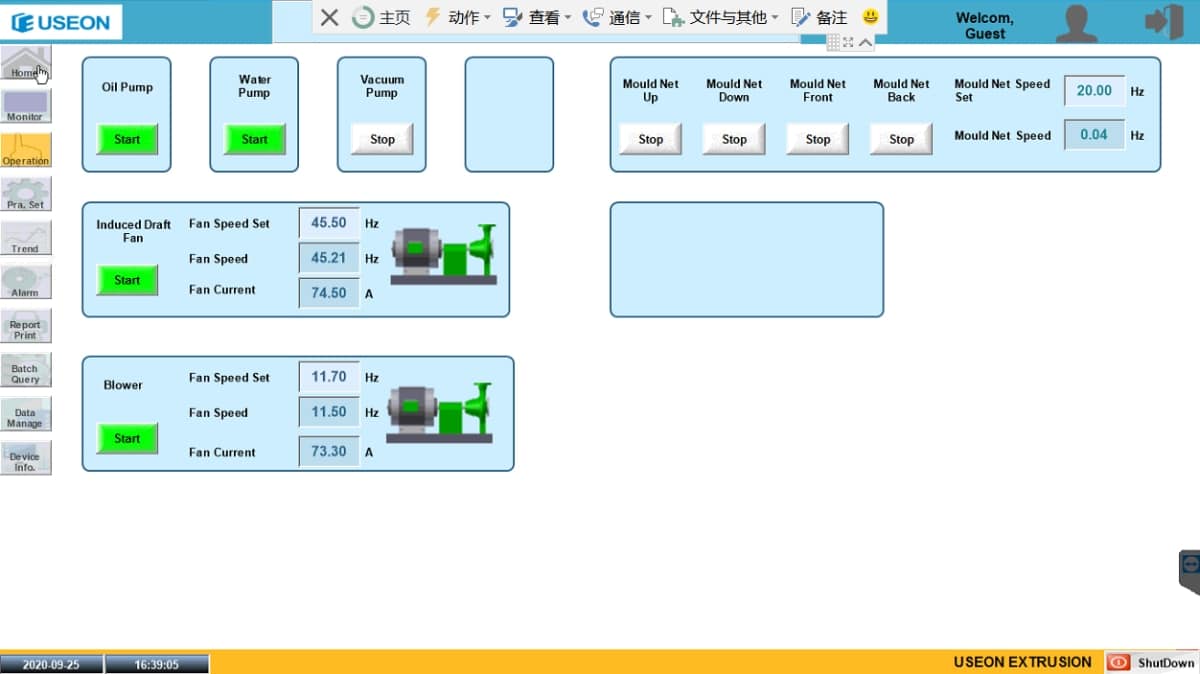
Fig. 2: Water pump and oil pump
Fig. 3: Blower
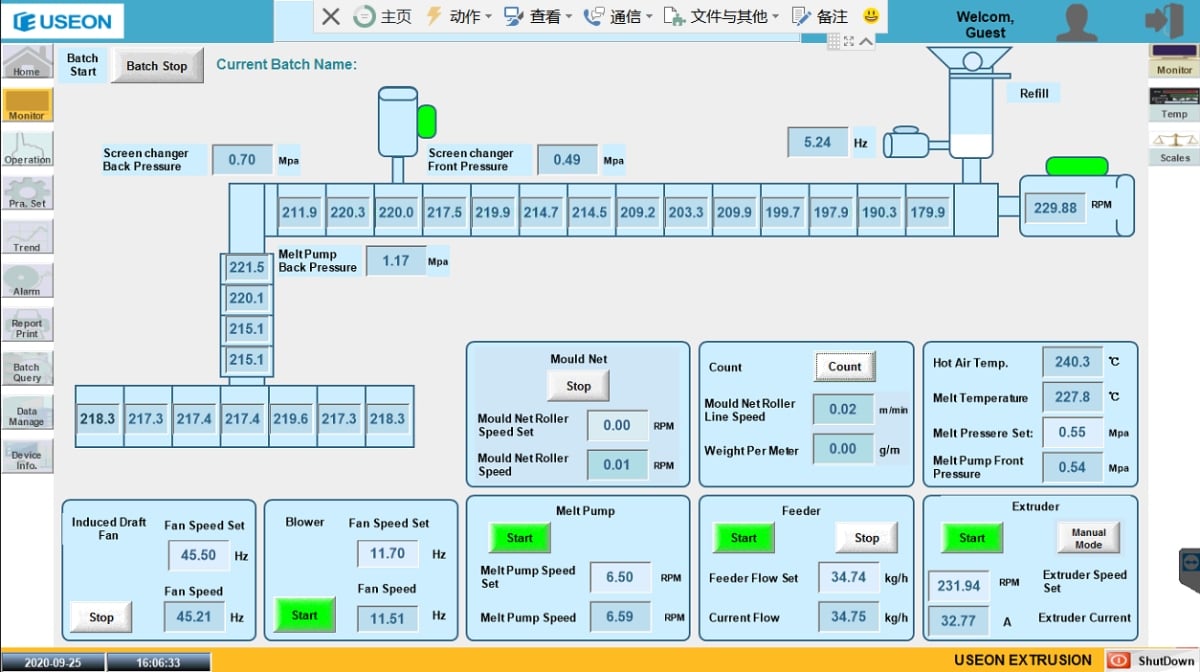
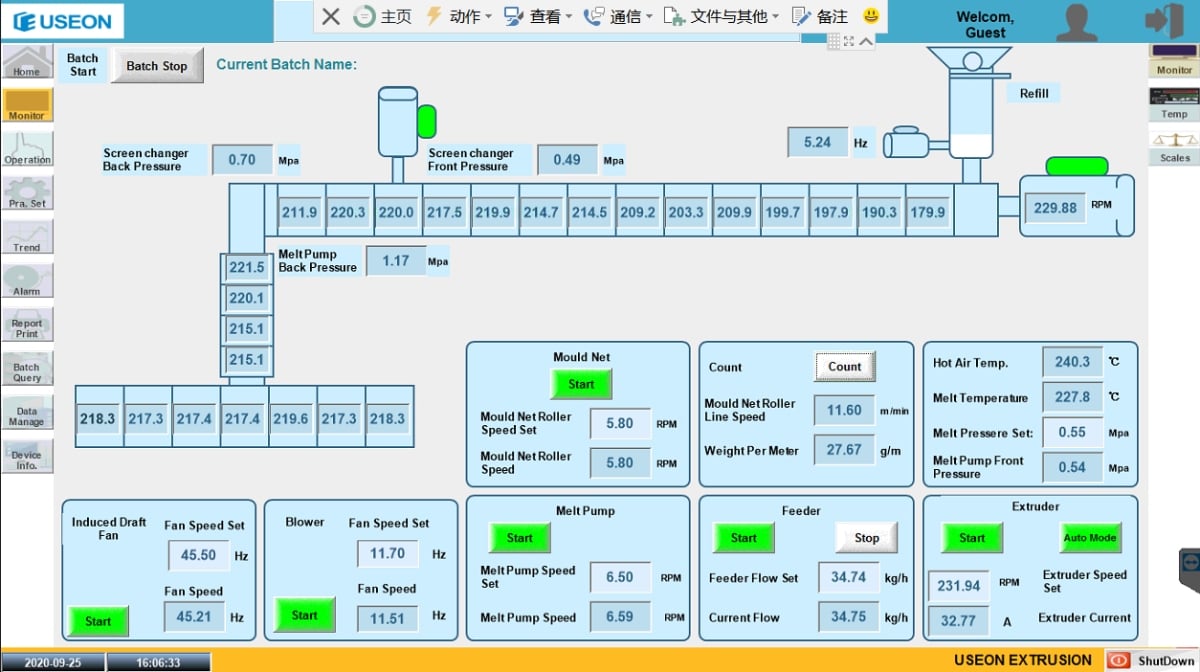
4) When the “Hot Air Temp” is above 240℃, start the Melt Pump with speed 6.5Hz, Feeder Flow Set 30kg/h, and Extruder with speed 200rpm (Fig. 4).
Fig. 4: Speed setting
5) Start the Vacuum Pump.
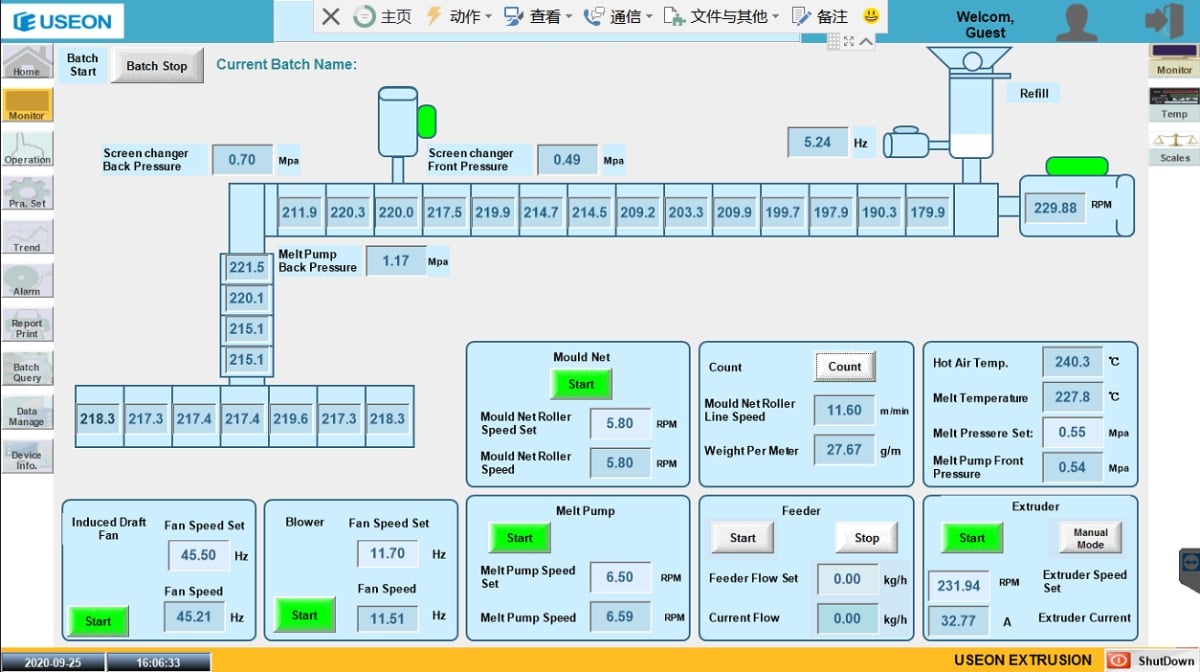
6) It takes about 10 minutes for the fiber coming out stably. Then change the “Manual Mode” to “Auto Mode”.
7) It takes about 20 minutes for “ Melt Pump Front Pressure” changing near by 0.55 Mpa. Then start “Induced Draft Fan” with speed 45 Hz and “Mould Net” with speed 5.8RPM. Press “Count” (Fig. 5).
Fig. 5: Start Fan and Mould Net
8) Start the Winder. The speed of rubber roll synchronous with the speed of “Mould Net”.
9) Press “Operation”, then press “Mould Net Front/Back” with speed 20 Hz (Fig. 6).
Make sure the fiber blowing on the center of Mould Net roll.
Two operator take the fabric from Mould Net roll to winder.
Press “Mould Net Up/Down” to adjust the distance of spinneret plate and Mould Net roll about 175mm.
Fig. 6: Moving Mould Net
10) The relationship between the speed of each motor:
Speed list
| Induced Draft Fan/Hz | Blower/Hz | Melt Pump/RPM | Mould Net/RPM | Time |
|---|---|---|---|---|
| 45 | 11 | 6.5 | 5.8 |
A) Increase the speed of Melt Pump, the Feeder Current Flow (kg/h) and Extruder speed will increase automatically.
B) Increase the speed of Blower, the fiber will become thinner, the filter efficiency will be higher. You need to increase the speed of Induced Draft Fan before increasing the speed of Blower, otherwise the fiber won’t stick on the Mould netting roll.
C) Increase the speed of Mould Net, the weight per square meter (GSM) will be reduced. You will get the GSM as you want by adjusting the speed of mould net.
11) Start the Electrostatic with 40~45Kv voltage. Two wires should be tightened enough.
12) The winder can be automatically changed according the setting length.
1) Switch off Electrostatic.
2) Change the “Auto Mode” to “Manual Mode” and stop the feeder (Fig. 7).
3) Reduce all the speed according the following list:
Speed list
| Induced Draft Fan/Hz | Blower | Melt Pump | Mould Net | Extruder /RPM | Time |
|---|---|---|---|---|---|
| /Hz | /RPM | /RPM | |||
| 45 | 11.7 | 6.5 | 5.8 | 231 | 2 minutes |
| 30 | 10 | 5 | 4 | 150 | 3 minutes |
| 30 | 10 | 5 | 2 | Until fabric break | |
| 10 | 5 | Until no fiber coming out | |||
| 10 | Until the “Hot Air Temp” below 120℃. |
A) Stop the Extruder together with Water Pump, Oil Pump and Vacuum Pump.
B) The fabric will become more and more thin. Cut the fabric before it break.
C) Press “Mould Net Back” with speed 20 Hz. Move the Mould Net backward and collect the fabric into one tank. Stop “Mould Net”, “Induced Draft Fan” and Winder.
D) Keep Blower with speed 10Hz and Melt Pump with speed 5RPM for about 20 minutes. Stop the Melt Pump until no fiber coming out.
E) Stop the “Fan Heat” and keep “Blower” speed 10Hz until the “Hot Air Temp” below 120℃.